Sunday, January 10, 2016

Jan. 4 - Jan. 8, The week in Patterning - 3

I completed the 1860 waist from EvaDress/Barrington House Polonaise pattern.  I look forward to obtaining photos of me wearing it to Sharlot Hall Museum Living History program yesterday for you all to see! Look up the first week's post for the in-progress and intro to this project.
Also in week 1, I gave a finishing detail of the cotton bobbinet Vogue 1935 Tucked Blouse (worn over the low-backed 1932 slip). It is now complete with vintage 'West Germany' crystal buttons and all!
In more patterns to come shortly, I am ready to grade a 1929 Bust Reducer into multiple sizes! Here you see it below right (original size is 48" bust).
At lower left is a 'simple' French 1920 coat I am about to digitize and will make available in multi-size as well.

Friday, January 1, 2016

Dec. 28 – Jan. 1, The week in Patterning – 2

I have 7 yards of sheer cotton to use with last summer’s 1869 bustle dress pattern.
I stretched it out from my studio into the kitchen where my pair of rabbits were playing for the day. This meant I had inadvertently created a bunny runway when I thought I was quickly assessing how the pattern would take the plaid!

The studies at lower right are options I am throwing around depending on how much of the sheer I have for such a finish. Part of this week's patterning has been to digitize, print and revise the pieces as well as add seam allowances to each and create cutting layout diagrams for them. The option at top is the basque originally prescribed as part of the bustle dress ensemble, yet the two below are offered as separate, more formal finishes. I will offer them as such once they are in multiple sizes.

Lastly, I managed to uncover yet another 'Hidden Gem'. I began issuing those patterns that somehow slipped through the cracks over the years, or needed a little something to complete it. Not sure how I overlooked this one as I went through some possibilities in '15, so it will be up in the next day!

Dec. 21 – Dec. 24, The Week in Patterning - 1

This is a new section featuring what I have been up to by-the-week for lack of posting much online. I gleaned inspiration for posting more often this way from Ann Wood Handmade. Each entry will be posted in storyboard fashion (click images for larger version). Please enjoy and Happiest of New Years' to you!

I consider a couple of current sewing projects as a lead-up to this Christmas. I machine-tucked the bobbinet blouse December 2014 when first experimenting with circa 1935 Vogue’s pattern 6969 (which had been a gift to me earlier in the year). This week was devoted to wrapping seams, securing the MANY thread ends off each pleat and roll-hemming edges.
The blouse came from the drapes off the bobbinet gown I created from circa 1935 Vogue’s Couturier design 371 in 2011. The cotton bobbinet is perfect for this blouse! I will post the complete blouse the week of Jan. 4.
This blouse pattern is currently available in its original size (34" bust), yet I will work the blouse up in multiple sizes between other pattern deadlines the first half of 2016.


The second project is a sheer waist (also in progress) I created from our 1860 Polonaise Pattern released in 2013. The waist is meant to go under my Swiss waist I created last December (shown over a borrowed blouse). The completed waist will be shared the week of Jan. 11.
I wear the waist(s) for Living History interpretation at our Sharlot Hall Museum. January is devoted to handwork for me, which means I take the Spanish Jacket and continue to add to the soutache motif!
I received a request for the Swiss Waist in pattern form and I have a great deal to offer this year, so I will see how I do this year as far as tucking it in between pattern deadlines!

Thursday, October 29, 2015

EvaDress Patterns Challenge: 'Thrifty Thirites' Starts November 15, 2015!


‘Thrifty Thirties’ is a sewing pattern challenge to create men’s or women’s garments from 1930’s EvaDress patterns. Accessories (hats, bags, etc.) are not counted as an individual project, but will strongly be considered as accompaniments in a submission. Participants may each enter more than one project for this challenge.

Projects may not be started earlier than 12:01 a.m. EST on November 15, 2015, although muslins for fitting may be created any time before then.

‘Thrift’ implies frugality, thinking of The Depression-struck 1930’s. ‘Thrift’ may take on different meanings for this challenge. One may want to pull strictly from stash to create a submission, while others may feel that splurging on that long-wanted garment may warrant finding the goods and the means to pull out all the stops (in lieu of buying a designer or ready-made piece for a particular event).

Either way, I find superior fit in a garment to be somewhat of a frugality especially in looking at examples of 1930’s fashion. Proper fit in clothing did not go the wayside in hard economic times. If anything, it was an economy of style in itself and proper fit prevailed no matter one’s economic circumstances. That said, judging of final submissions will rely heavily on very well fitted garments with a variety of details endemic to 1930’s designs.

No purchase necessary to enter, so 1930's EvaDress patterns from stash are fair game!
The closing date to submit projects for this challenge is 11:59p.m. EST on January 15, 2016.
The more complicated the project-an intricately embellished gown, or ensembles over individual garments, the higher the consideration for placing as a finalist.
One top finalist will receive a $150 non-expiring gift certificate to EvaDress.com. Depending on the number of entries, five finalists will be selected based on quality of construction (construction detail shots are a must), accuracy to the challenge guidelines and overall design with projects remaining devout to the original pattern style lines.
Projects submitted to other challenges outside of this one are certainly welcome, provided they fit into the Thrifty Thirties parameters stated here.

The top finalist will be notified here no later than 11:59p.m., January 17, 2016.
Please keep in mind by entering this challenge that you are allowing EvaDress to make use of all images submitted for other promotions, blog posts, as samples from the patterns, etc.
To enter, go HERE and post high quality images (longest edge of photo to be at least 11”) to include front, back, side views and construction/design details. Post the main photo to the page and subsequent project photos in the comments section under the main photo. Be sure to write why you chose the particular project you are submitting and let us know what your idea of frugality is behind your project. Also indicate which pattern was used.
E-mail me with questions or post them on my Facebook (Alexandra Reynolds, a.k.a. EvaDress) wall or posted by commenting on this blog post.

Sunday, September 20, 2015

My 2016 Make it with Wool

This is the first of a series detailing my three-piece 2016 Make it with Wool entry.
In an effort to present wool as unexpectedly fresh and light, I am creating Vogue's 1949 Kimono Blouse from pattern 6970 with large draped collar in sand-colored superfine gabardine.  This wool gabardine has such a subtle sheen due to its ultra-fine weave, it's nearly satin!  Having this lustrous fabric is exciting as I think this ensemble should 'sparkle' in places.


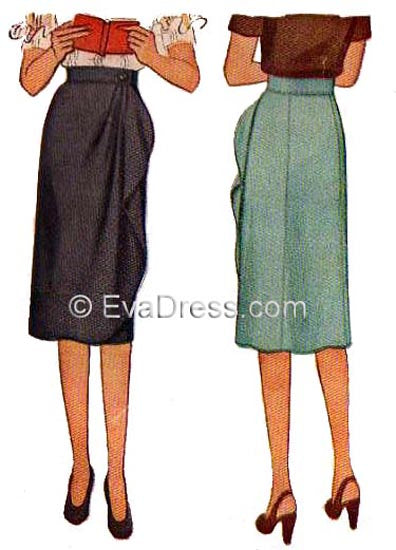
The second piece is the 1944 wrap Skirt originally by McCall.  I sewed it in a lightly woven Pendleton with Fleur de Lis and paisley figures in charcoal tones:

The detail below the pattern front shows the Hong Kong seams wrapped in silk habotai with which I also lined the skirt in a dark navy.
I first spotted this Pendleton at the 2014 MiWW state final and thought it was the most beautiful thing I had ever seen in wool!  I did not win the piece (it was the gratis piece for that year from Pendleton Woolen Mills), but I did track 1-1/2 yards of it down and knew just what to do!  I used the fabric's woven border at the hem and the drape of the left faced section of the skirt went perfectly with Gail Patrice deni-fuse interfacing.


The idea is that the blouse and skirt are soft, sculptured pieces.

As for the color scheme, I am following a palette of colors I enjoyed on Stinson Beach four years ago.  The charcoal of the skirt and the sand of the gabardine both match colors on each end of the mussel shells I picked up from the beach.  I wanted to pull deep blue out of the charcoal woven for some reason (perhaps that seashell's strong influence on me?) so lining it in navy was so suitable.
That said, enter the otherwise 'blue' aspect of the project; the corselet.
I am accessorizing the blouse and skirt with a Tunisian crocheted corselet.  The pattern is from Vogue Knitting, Holiday 2004 (seen here).  To satisfy the competition's requirement of wool content, I chose Madeline Tosh Merino Light for this piece.  The variegated blues in the merino stitched corselet make up the range of blues through the center of the sea shells.
I had made a Tunisian stitched corset in Alchemy's bamboo 8 years ago, only wider than the version I am now doing.  With the large blouse collar and the fact that I am short-waist-ed, I did not want to be engulfed in the wider original version of the stitched corset.

I understand the history of the Tunisian Simple Stitch to be murky, yet the idea of the dense stitch for warm sailor sweaters or Sontag's in the 1800's is clear.  I say this is 'Not your mother's afghan stitch' because as a kid in the 70's, I remember the sunburst-patterned afghan in gold, almond and yellow swathed over couch at any given time.  I like the idea that Tunisian-stitched items started out as very pragmatic, then leaped to one of THE hand stitches in 1970's throws and now has come back as wearable art.
As I like to play on paradox, my concept in the merino-stitched piece dictates what is thought of as a very dense, grid stitch becomes so light and de-materialized is almost ethereal in a very structural corselet!  The wool becomes translucent when crocheted over spiral steel dressmaking bones and the grid stitch pattern opens up when stretched around the midriff.


As in my submission last year, I explored different graphic scales between each piece.  I mentioned how smooth the gabardine blouse is and made a step up to the grainy weave in the Pendleton skirt.  The final transition takes place in the pixilated stitches of the corset, being the piece which separates the blouse and skirt.

More construction details coming up in the next post!

Wednesday, August 19, 2015

Sewing the Collar on the 1929 McCall Evening Wrap Pattern 5945

This post addresses methods of constructing and attaching the collar on this 1929 wrap pattern:


Technically this is a shawl collar, so the collar may be attached and enclosed in the usual shawl collar manner which is outlined further down in this post.  Alternately, the collar may be constructed and then attached which is first detailed below.
You ask which method to use?  The answer is simply up to your sewing experience or will to learn a new method as we all know in sewing, there is more than one way to go about many things.

Joining the collar/collar facing and then attaching to the wrap:
Side note: No matter which method is used, the first steps are to shir and dart each collar and facing section. The images do not show the lining that would otherwise be included in the process of making this wrap. Click images for larger views:

Sew optional band to outside of collar section (not shown).
Run long basting stitches along inner edge of collar section, as indicated on pattern. The first row of stitches is applied 3/8" from the raw edge and subsequent rows are stitched 1/2" apart. It is then important to bring all thread tails of the shirring rows to the wrong side of each collar and facing section. This way, they can be caught into the center of the large dart you are about to sew, and then secured, thus not showing on the right side. Shir and dart collar facing the same:


Shows the wrong side of collar with thread tails brought through and dart is stitched. Cut dart and press open:

Shows the right side of collar with thread tails brought through and dart is stitched:

After sewing the smaller darts along the opposite edge, press darts toward center back of each section. With right sides together, stitch collar and collar facing sections together along un-notched edge. Turn and press seam in edge; baste open (notched) edges together.

Trim extra seam allowance edges from corner:

Clip into seam allowance of fold line at wrap front, shown as a O in this photo:

The fold line at wrap front is indicated in this photo by a black line. Align the basted edge of collar/facing with the top of that line to ensure corner of collar is exactly matched with corner at front fold-line seam allowance. This should ensure that seam lines will converge between the faced collar and wrap-baste in place:

Turn wrap on front fold line so raw edge of wrap facing is even with raw edges of collar and wrap front underneath. Photo shows (from wrong side) the fold line turned with front corner of collar brought through the clip (made into the seam allowance from a couple steps before). Stitch in place:

Shows collar and facing turned (circle mark is lightly visible at corner of joining):


Joining in the shawl collar manner (these first steps are repeatedly posted from the process given above):
Sew optional band to outside of collar section (not shown).
Run long basting stitches along inner edge of collar section, as indicated on pattern. The first row of stitches is applied 3/8" from the raw edge and subsequent rows are stitched 1/2" apart. It is then important to bring all thread tails of the shirring rows to the wrong side of each collar and facing section. This way, they can be caught into the center of the large dart you are about to sew, and then secured, thus not showing on the right side. Shir and dart collar facing the same:

Shows the wrong side of collar with thread tails brought through and dart is stitched. Cut dart and press open:
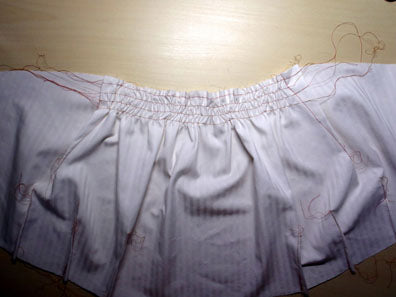
Shows the right side of collar with thread tails brought through and dart is stitched:

Clip into the seam allowance of front facing turn line, (to circle) as shown in first photo. In this method, the right side of the notched edge of collar is joined with the right side of the wrap neck edge-NOTE: End of stitching is at point where the seam line of the collar edge and wrap edge converge-there is seam allowance which overhangs here. Stop stitches at as in second photo:

The right side of notched edge of collar facing is joined to right side of wrap facing (as is stopping stitches at same point) in same manner as collar section (regard note about seam lines converging at same point, above.

At this time, the collar and facing are joined with right sides together along the outside (un-notched) edge:

The collar is turned right side out as is the wrap/wrap facing along facing fold line indicated on wrap front piece (press seams of collar/facing in edge and press along facing fold line-the collar facing edge is shown not completely sewn to facing edge for reference):

Shows collar/facing joined to wrap from the outside (collar is shown not completely sewn in place for reference):

Patterns - Summer Update

Been away for a while-I am guilty of having nearly vanished under pattern deadlines and I commenced sewing for this year's Make it with Wool Competition.  That said, it means I will be back on here posting a great deal as I share details and construction methods on the four-piece ensemble I am submitting this year.  Three of the pieces are from EvaDress Patterns and one piece actually comes from Vogue Knitting so stay tuned!

First bringing things up to speed, I launched the German Beach Ensemble pattern in July.  The pieces are the casual, wide-leg trousers with turn-ups, halter top and optional jacket:

I just finished everything for Vogue's 1951 Kimono Blouse in multi-size to start shipping this Friday!


Here is a little preview of what is soon to come in multi-size patterns!
I posted a vote on Face Book so others could decide which of the three following dresses would be next in multiple sizes.  Voters chose this Vogue Special Design for a day or evening dress with skirt godet and kimono bodice with high shaped skirt waistline:
First runner-up is the 1945 Butterick dress with smocked openings at the shoulder. It (as will the following 2 patterns) will be available in their original sizes until I bring them to a range of sizes next winter and spring.:
Lastly, another Vogue Special Design with optional panier effect at the hip and draped fullness across bust:
A customer sent this unique pattern to make available in multiple sizes out of such generosity.  A 1937 blouse with overwaist (connected to the skirt) and tie:

I still have some surprise patterns coming out before the beginning of fall which I will post here!