Monday, December 16, 2013

1929 Coat with Pin Tucks and Godets: All Wrapped Up!

My finished 1929 German Coat!  It took first place in the adult division of Arizona Make it with Wool and off to the national competition it goes! (click on images for larger view)


Can't believe I missed pressing that right godet at the back!

Now for some finish details, sleeve pin tucks:

Pin tucks at the back:

Pin tucks and godet at front:

Bound buttonhole:

Button!

I expect to have it cleaned once it comes back from judging to relax any puckering.

Tuesday, December 3, 2013

Pinterest?

For any of you who look at Pinterest.com, I posted my complete pattern lineup for 2014. Click here to check it out!

Sunday, December 1, 2013

New Multi-Size Pattern, the 1935 Pajama Ensemble

Here is the 1935 Pajama Ensemble in sizes 14 to 46:

It's a nice pattern if you want to take on pin tucks and mitering bias facing to square necklines and armholes.  Here is a nice detail from the instructions to show you just what I mean!


Recommended fabrics are: Silk Crepe, Rayon Crepe, Satin and Taffeta.  Click here to see the yardage chart and schematic for this pattern.

On another note, I had scheduled to issue this beautiful 1956 Vogue Kimono (Day or Evening) Coat:

I had to put that plan on the back burner when dealing with a HUGE printing problem during November in order to keep following patterns on schedule.  I plan to have this coat ready to go first quarter of 2014.

Monday, November 25, 2013

1929 Coat with Pin Tucks and Godets: Final Stretch Finishing Tips

I am wrapping up the coat this week.  I am 'spoiling' the lining rotten with a bias-turned hem so the bottom of the lining will lay perfectly smooth!
This is just one little trick I like to do with single bias facing to lend a nice finish with interesting detail (click on images for larger view):


I treated the brocade lining hem with a single bias of silk organza.  I had plenty of scrap around to create it in the same red to match the coat.  That way, if the bottom of the lining hem flips with movement, it will blend nicely with the coat.

The bottom of the lining hem is 1/2" above that of the coat (click on images for larger view):


Sunday, November 17, 2013

1929 Coat with Pin Tucks and Godets: Godet Lining Tip

I treated the godet lining pieces the same as for the coat wool godets as far as turning a silk organza facing at the very top portion.  There is one big difference in that I stitched that facing down each side as shown (click on images for larger view):


This is so that I can make complete points out of the top of each godet so I may get crisp, secure turnings at that difficult juncture.  As you see, I clipped into the seam allowance so I may stitch the rest of the godets down each side by machine.  This also could have been done on the coat wool, but I felt I had better control of the turnings doing them by hand (as posted here) since the wool is so bulky.


Stitching down from the clipped seam allowance (which is at the bottom of the organza facing) when sewing the godet lining to the coat lining:


...and sewing the opposite edge of the godet to the lining from the clipped seam allowance (clip is not visible from this side, but its position is indicated by blue pin):


A view of the godet lining stitched into place from the wrong side, relative to the organza facing:


Godets are turned and pressed in place and ready to be hand-stitched along the edges turned with the organza facing:


Tuesday, November 12, 2013

1929 Coat with Pin Tucks and Godets: Hem Bias and Pin Tuck the Lining

Whenever possible, I like to keep bulk to a minimum in my sewing.  So, I am finishing my coat hem with a bias self-facing (click on images for larger view):
I am using fusible interfacing in just the hem of the coat.

A 2" hem is given in the coat pattern, yet I shortened the pattern below the waistline so I can use just a 1/2" allowance at the bottom to turn the bias facing I will sew.  I cut fusible interfacing on the bias about 3" wide so I can place it with the contours of the bottom edge of the coat.  I also pieced it so it goes behind the seam allowances of the coat.

Here, the bias interfacing is pieced and overlapped 1/2":


The coat hem is now ready to be turned and pressed to fell the bias to the wrong side of the coat.  On that note, I move to the inside of the coat.  I will pin tuck and assemble the brocade lining the same as for the coat.

Saturday, November 2, 2013

1929 Coat with Pin Tucks and Godets: Stitch the Godets on and Trimming the Scarf Collar

Per the previous post about sewing this coat, I emphasized the process of facing the top edge of each godet to ready them for stitching to the coat.  Here, you see I am stitching the godet with the top edges turned in with the organza facing (click on images for a larger view:

After getting that seam in, I then clipped into the godet seam allowance just below my organza facing and stitched the top godet edges in place by hand.  this is better illustrated in the process for the lining godets, see November 17 post above.

When I turn the godet to stitch other side down the godet opening, I clipped into the seam allowance at an angle to fit the machine as far up as possible (not shown).
The free section of the top edge on the godet is to be invisibly hand-tacked to the coat, making sure to catch each folded corner of the top in.

When it came to cutting the faux fur trim for my scarf collar, I opted to cut it in one piece which would wrap over the top seam of the scarf rather than be sewn into that seam to reduce lines and bulk.  The advantage in this is also in cases where real fur pelt is used to reduce stitching and piecing.  Notice I faced the faux fur trim along the inside vertical edge only.  It is then turned right side out and with raw edges matching, hand basted to the fur layer (click image for a larger view):


I then hand basted the faced trim to the right side of the scarf so its edges will be caught in with the stitching of the scarf ends (click image for a larger view:


Alternately, the fur trim could be cut and seamed into the scarf (having cut the scarf fabric away with seam allowances included), but I like the idea of having the wool behind the trim for weight.  It swings round so well!

Thursday, October 31, 2013

Help with the 1929 Ensemble Skirt

I have revised the instructions for this ensemble skirt to include the following.  Feel free to download the pdf here:


Thursday, October 24, 2013

New Multi-Size Pattern

This is one I hadn't previously announced. It is the 1939 McCall Evening Gown in sizes 14 to 42:


The finished model (size 14) is in silk charmeuse:

Wednesday, October 23, 2013

1929 Coat with Pin Tucks and Godets: Sewing Godets

I have all my loose threads secured onto the wrong side of each coat piece.  So before I stitch the coat seams together, I will put the godets on first.
I applied a stay as a technique I like to use when sewing fabric with a turned corner  I also use this method when stitching a lapped seam onto another fabric.  I prefer to use silk organza as it compacts so well when folded and pressed.  It really makes for a clean and non-bulky application.

I cut a piece of scrap organza to fit over the points at the top of each godet (click image for a larger view):


I turned my machine stitch length down 10 per inch so the stitches will be fine enough to make the inside corner secure and crisp.  Using the seam allowance given (1/2"), stitch the organza to the right side of the godet along the top edge where the top corners of the godet will be sewn to the coat.  I did the stitches in scrap thread of different colors so they show up easily (click image for a larger view):


Clip through both layers to the inside corner at marking, trim near seam allowance, turn and press the seam allowances toward the organza facing (click image for a larger view):

Shows the organza facing turned and pressed to the wrong side of godet (click image for a larger view):

Shows the organza facing turned and pressed from the right side of godet (click image for a larger view):


The godets are now ready to be stitched to the coat!

Detail of making small stitches at the top of the godet where the edge is made with the organza facing. Be sure to catch the godet only in the organza side of the seam taking care not to grab the wool side.(click image for a larger view):

Wednesday, October 16, 2013

1929 Coat with Pin Tucks and Godets: This is a great day to do competition sewing!

This is the first of a series I will post when working up my 2013 Make It With Wool submission.

I am sewing the 1929 German Coat with Pin Tucks and Godets in melton.


I will line it with a contrasting silk brocade with a deco pattern in it.

First photo shows the back cut and marked with tailor tacks.  I recommend marking the pin tuck lines at 4 to 5 inch intervals.


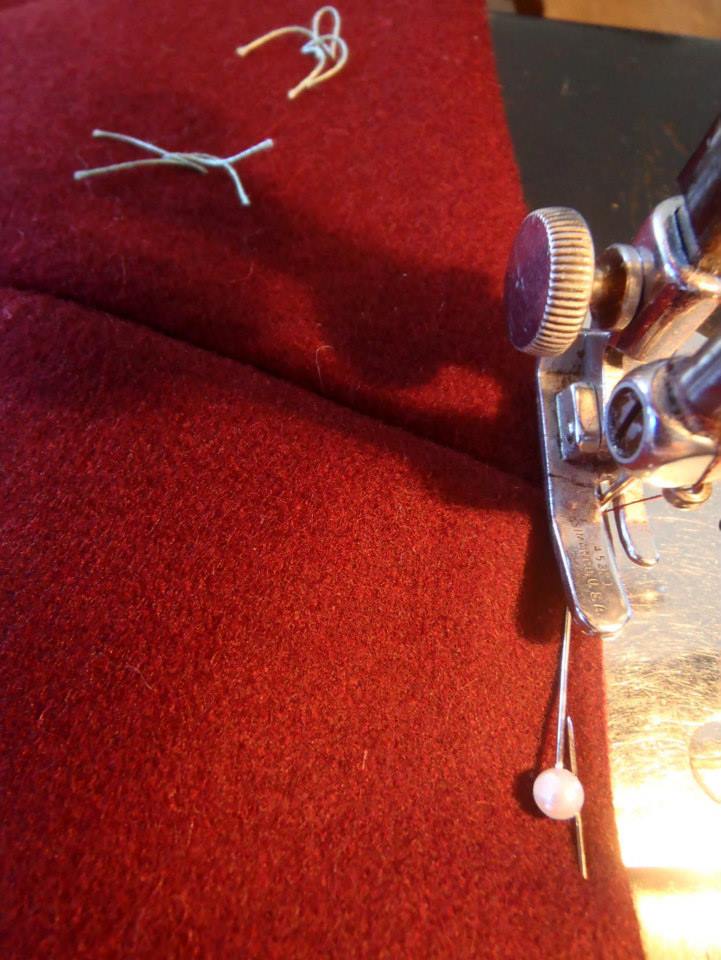
As I fold the melton to make each pin tuck, I am being very careful to keep each thread marking in the edge as I fold all the length of the back.  This is a 16-18 oz. 70% wool/mohair/cashmere with 30% nylon blend, so the stability of the weave is great for making really crisp tucks.  The arrow shows the start point for sewing the pin tucks.  This is also the location of the stitching detail photo below.


The Gütermann silk thread makes for beautiful stitching!  Just a few loose threads to sew in.


As for the coat front:

Stitch the bust dart from the wrong side of fabric:


After stitching the bust dart, get the machine needle just on the point of the dart (on the right side of fabric) so the line of stitching falls below it.


Stitching the tuck just above the bust dart on the coat right front. Here, I have lifted the feed dog and I am about to make my pivot for stitching the tuck down the length of the coat.


Here, I turned the fabric before setting the feed dog down and stitching that vertical tuck.


Have yet to sew threads to the wrong side (note I left my thread tail a little above that bust dart, I will take that extra stitch out so it will not pucker when I secure my threads). Also have yet to press this set of tucks.

Thursday, October 10, 2013

EvaDress Web Site Update

I have added links (as highlighted below) to the bottoms of decade pages of my web site to assist in finding multi-size patterns respectively. You will see that the men's pages are similarly arranged:

Wednesday, October 9, 2013

New Price on the EvaDress Print Catalogue

New price on the EvaDress print catalogue is now $10USD.  The new international rate is $15USD.  Both prices include shipping.

Monday, September 23, 2013

On the Boards, Fall 2013

We have a fall chill in the air where I live.  It is refreshing as I hope you will find the remaining patterns I have to offer this year.
The 1935 Pajamas:


and the beautiful 1956 Vogue Kimono (Day or Evening) Coat:

Sunday, September 22, 2013

Correction in Pattern E30-6983

I revised the yardage chart and cutting layout to correctly reflect the fact that the bodice stays are cut in fabric to match the skirt versus the bodice as previously indicated. Please download the new pdf pages by clicking on the chart below: .
NOTE: The fabric amounts have not changed.