Wednesday, December 31, 2008

My 2009 outlook on the patterns

2009 is the year I am focusing on 2-1/2 dimensional styles. This means I am going to work with patterns featuring fabric elements that leap off the garment, yet do not cease to be a part of it. Darts, pleats and tucks are all valid dimensional effects in fabric, but this study goes further. For example, this favorite blouse has a jabot which is in one with the blouse front. Only its facing is a separately applied piece:


Here is a German frock pattern I am offering early 2009:


While the jabot is a separately applied piece (sewn to the back neck edge), I resolved to add it under this 2-1/2 D theme due to the amount of volume the jabot adds to the front of the frock, yet it is tucked under the folded fabric belt. More to come!

Wednesday, December 24, 2008

One whoes beauty equaled what she offered Us...

It was brought to my attention last week that sadly, Charlotte of VintageCat.com is no longer with us. If you look up her former home page link, there is a message to the effect that she lost a long-time battle with cancer just recently.

I have had the joy of working with her only a few times over the last 10 years and I had no idea she was struggling with the multitude of difficulties and pain cancer brings.

Just this October, I wrote a great deal of material I intend to publish about vintage patterns and I made reference to her wonderful business ethic as well as information on how to source fabulous vintage patterns at RetroCat. With the draft in progress, I will leave all mention of her business in place due to the fact that I feel people should certainly keep her in mind.

I feel that the most beautiful things are those which do not last a great long time. A fine character such as hers is as beautiful yet fleeting as the rare patterns she availed to all of us.

Sunday, October 26, 2008

Official presentation of Option Explicit Gown

I retrieved my laser-etched gown from Knowlton School of Architecture a couple weeks ago and was finally able to shoot it with the mulberry leaves I picked in July with which to display it! 
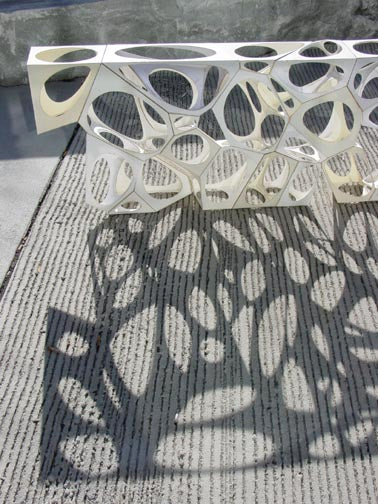
When in motion, this laser-etched silk/metal organza rustles not unlike an array of delicately drying mulberry leaves the silk worm is fed to produce the filament eventually spun into silk.

Of course, this means that since the gown above is no longer on display, my only dress form is open for other finished examples, so below you see the 1930 evening gown in iris sueded charmeuse!

Saturday, October 11, 2008

On the Boards Fall, 2008 Update

Below is a 'favorite' Claire McCardell dress pattern launching in multi-size next month:


I also have this men's 1934 windbreaker in size 40 chest up.

Sunday, August 31, 2008

PatternReview.com Lined Jacket Contest Entry

Here is my lined jacket entry from original McCall 7531 (version B):


Here is the detail of buttonhole integrated in seam between collar/jacket and collar/facing:


Per instructions taken from 1935 DuBarry trench coat:


Stitch at neck edge matching oo and easing ‘F’ to coat; leave right end of seam open between oo in ‘A’ for buttonhole. Turn up back seam between oo; clip and crease seam open in front of o.
Join Front Facing ‘E’ to opposite edge of ‘F’ on inside as far as o at shoulder easing ‘F’ to ‘E’.


Leave right seam open between oo in ‘E’ for buttonhole. Clip and crease seams open. Fold ‘F’ in half and place ‘E’ on outside of ‘A’.

Sunday, July 13, 2008

Want the fabric waistband, not the bulk...

An addendum to the 'invisble facing' concept:

I like to have the 'out' side of many of my skirt/trouser waistbands match the fabric of the finished garment. It is not always desirable to have the same fabric on the inside face of the waistband due to bulk issues particularly when using wool flannel, wool crepe or in this case burn-out embroidered silk organza.
Sooooo, I customarily cut the 'outside' width of my waistbands in self fabric, adding about 1/2" to 5/8" seam allowance along the top edge and I cut the other half adding the same amount of seam allowance in a facing-appropriate fabric, say scrap silk taffeta, shantung doupioni, or in the case, a plain silk organza to match the hue dominant in the finished fabric (burn-out embroidered silk organza).
The result this time is a wonderfully stable, yet 'non-intrusive' inside waistband face.


How's that for 'gorey' sewing details? I have plenty more where this came from :o)!

'Invisible' Facing

I am a fan of the facing. I like Vogue patterns for their facing tendencies. When working with a vintage Vogue pattern dating to the 40's, I made an error when cutting the lining for the front of this halter top (view A at left):


So, I created an 'invisible facing' for my rescue! This is not part of the original pattern that was to be faced, It was to be narrowly hemmed. When I cut my front lining piece too short to make it close enough to the bottom edge of the finished fabric front, I cut a silk organza facing from the bodice front pattern and stitched it to the bottom edge of the fabric front, turned and pressed it into place:


Turned the top edge of the organza in and catch-stitched it to the narrowly hemmed lining which comes down over it:

Tuesday, July 1, 2008

Ahh, the dangers of sorting through a stash!

I am sure we can all relate to the snowball effect sorting through any stash can bring on. I leafed through a stash of ephemera I have been collecting over the years during my hunts for vintage patterns to find these dandies:


I delved into the box for German 1920's masters from which to draft some patterns to offer everyone later this year when I was broadsided by these 1950's styles and I started fantasizing about drafting patterns for them to make some pieces for my own professional wardrobe. Love the cheetah-print-looking skirt and now I am on the hunt for faille...but, also devoutly drafting 20's patterns :o)!

Saturday, June 7, 2008

Vintage Fabric ReDux

I found a 1-2/3-yard piece of 36" wide circa 1950’s(?) 60's(?) Waverly interior fabric at a yard sale six years ago. Along its selvage is printed: 'A Waverly Bonded Glosheen'. It is a slightly polished, good grade of cotton and I sat on it, wondering how best to maximie it for whatever use I could eventually come up with.

A skirt! (I can keep sitting on it, yet have it use, ha!) To make the most use of it, I cut the piece in half and sewed the selvages as the side seams. I narrowly hemmed the bottom edge and folded a hem at the top nearly equivalent to the width of a waistband. I then fit at the top according to my waist measurement by creating box-pleats at the right and left sides of the front and back.
To get the skirt on and off, I left the back left box-pleat un-stitched and applied white hooks and eyes to each side of the box-pleat fold thus, making the waistband longer for me to get over the hips and yet close down with the hooks to fit at the waist.
Over timie, my daughter and I add Swarovski flatbacks here and there, plus a little hand embroidery to augment the French cafe print.
Makes for the Optimal Picnic Skirt-and is always a hit at every barbeque to which I wear it!


Front of the skirt:


Detail at the hooked box-pleat:

Saturday, May 31, 2008

Wool flannel lace-Why not?

Cut this pattern into wool flannel with the laser cutter and same pattern via VBS. Settings are: 10% speed, 100% power, 3500 frequency on May 28, 2008...

Sunday, May 18, 2008

It's alive. It's alive... It's alive....

The fantastic etched metal silk gown...


Wednesday, April 16, 2008

Option Explicit Success!

First two panels etched today. Each 24"x36" panel took 50 minutes in the laser cutter. Settings are: 50% speed at 40% power with a frequency of 2500. The lens was cleaned yesterday, so I had to modify my test settings considerably as two fires resulted from using my tested settings from the days of a dirty lens! This post is mostly for my little self, but I will add photos of the gown in progress here once I have cut all panels... Early in-progress post. Also see this finished-state post. Wool Flannel Lace Experiment.

Wednesday, April 2, 2008

On the Boards-Spring 2008

I now have this wonderful pattern ready from my site:


I am currently working through this one from Germany, circa 1935 to have for you this June:


I have some more goodies up my sleeve for June and July.

Tuesday, April 1, 2008

Option Explicit-Part Drei 'Fray Factor'

I was finally able to experiment cutting the metal silk a couple weeks ago. It was very satisfying and I have determined the correct laser settings, but I learned that I cannot make a completely clean cut through the fabric to pass it off well enough. The fray (at right) is too much! I have decided that simply etching the fabric with the laser-cut pattern is the way to go for an equally impressive fabric design as seen at left. Once I have every yard of the metal silk I need for the entire project, I will cut it into the 24x36 inch panels and have about 10 goes with the laser cutter. Stay tuned!

Wednesday, March 5, 2008

Option Explicit-Part Deux

Strength of (Fabric) Materials
I am studying Silk Metal Organza to prepare it for the parametric design to create my metal lace and the first step is to do proximity tests on it. The fabric is 80% metal and 20% silk-the color is silver.
Since I am essentially 'de-materializing' the material to create the new metal lace, I wish to see how close I can cut the figures in my pattern design without the fabric loosing structural integrity.
As shown below, using 'analogue' dressmaking shears, the cuts are too close together at 1/8" apart, making the fabric too weak and it breaks between openings. Looks as though the minimum agreeable distance between figures is 1/4".

Also interesting to note at this preliminary stage is the limitation the machinery imposes on the design at a couple of scales. On the smaller scale, my 44" wide cut organza (I need a total of 3-1/2 yards) has to fit into a 24" by 36" laser cutting bed, so I have to give up 8" of manufactured width and one selvage in order to even cut the design into it with the laser. Also, I cannot do a long run of yardage at one time. The fabric has to be cut to 24" by 36" pieces which are totally flat.
On the larger scale, this affects the overall design of the frock. I will have to make the seams from piecing these 24x36 sections together part of the overall design which works well in the scheme of the 1930's-the decade this frock pattern originated. Also, I am cutting the frock on the bias which requires piecing much of the time anyway-more later!
Also see the finished-state post.

Monday, February 11, 2008

Option Explicit

Making the Fabric-An Added Dimension to Dressmaking

How many times have we envied fashion designers for being able to design 'their own' fabrics?

Well, thanks to parametric design, I may have broken into the realm of possibility!

In being taught to script a 3D modeling program (Rhinocerous 4.0) I learned how to script patterns of many different geometries. Doing this has been extremely cool, but it keeps getting even better when I think about it in terms of fabric! We laser cut patterns into small panels of heavy paper board and then joined the edges of each panel into a cell which created what I think of as a 3-dimensional lace. (photo below-I always try not to become completely mesmerized by the beautiful shadows this model produces!)


At some point, I plan to create a really beautiful pattern via script and experiment laser cutting metal silk organza with it. I think of this as my metal lace.
The pattern below is the base of a design which I have modified for bias cut metal lace. Since silver metallic lace is so hard to find these days, it is thrilling to think of making it myself so the frock will finally come to life!


In-progress post.
Also see the finished-state post.

Sunday, January 27, 2008

Possibility of the Perforation

As part of my Architectural graphics coursework, I read about the perforated cards used in the 19th century containing digital information (via perforations) to control textile looms. Of course in relation to that course, the bridge was being built to the use of digital information in computer systems, but I claim it also applies to the original tissue patterns dating as late as the mid-1950's.

If we think about it, these perforated markings on the pattern allow us to control where we make an indentation in the fabric surface via tailor tacks, chalk or carbon tracing. The perforations also enable us to do aligning functions with the patterns when placing the pattern with respect to the grain of fabric or when placing a pocket or other application accurately on the fabric design.
Paper sewing patterns are a special part of developable surface exploration. I know so many of you have told me you are as excited as I am about the 2-D paper becoming a 3-D garment via darts, folds, tucks, seams, etc.


The perforated markings which create the dart at the keyhole neckline in the pattern of a blouse I started last night.

Saturday, January 26, 2008

On the Boards - Look what's coming!

Customer Melissa sent me some some killer patterns that had originally been her grandmother's. Among them is a 1933 McCall (top-most image) I have been looking for over the last few years! So, it will be among the first I will make available in multi-size format.
E-mailing your preferences about what you want of these first will help very much!


Saturday, January 19, 2008

Grading the Raglan Sleeve

Elle requested that I share the process of grading the raglan sleeve down in size on pattern B30-4851


so here is...

Taking the raglan sleeve in is quite simple since there is normally a dart at the shoulder line rather than the traditional sleeve seam in the top of this sleeve style.


I simply shorten the length of this dart by cutting through a horizontal line I draft on the pattern between the middle set of perforations and the single perforation. I take it in 1/4" for each size down I wish to take the pattern as indicated here:


This pattern is unique in that it has a raglan sleeve that does not extend all the way to the neckline, so there is a bit of standard shoulder length to consider. If the adjustment above is not enough for the desired effect, one can also draft a vertical line from the shoulder seam to the bustline and cut along this line, taking it in 1/4" at the shoulder seam end to nothing at the bustline for each size the pattern is to be brought down: