Tuesday, June 21, 2011
Gatsby Frock Updates...
...(are added at the bottom of the blog post just below). I would LOVE to hear from anyone who is going. Would be fun to meet!

Saturday, April 30, 2011
White Out! (The beginning of my Ribbon Frock for the 2011 Gatsby Summer Afternoon)
I am in the throes of my next technical challenge=creating fabric by applying ribbon. I have been thinking about this project for years and while I am happy to be upon it just now, I must vent (a little).
A company from whom I have been ordering cuts for YEARS has done it to me again. They have discontinued a fabric critical to my purpose! Long ago, I planned this project for silk net I can no longer source. So, I have settled for silk net organza, which is a much more dense weave than I prefer, but it will have to do.
I pre-washed and dyed it using Jacquard Lumiere in Super Sparkle to get it as white as possible.
Below, you see my basting line to guide stitching Judith M's 7/8" petersham (in white) onto the silk. I will space each ribbon across the fabric 1/4" apart.


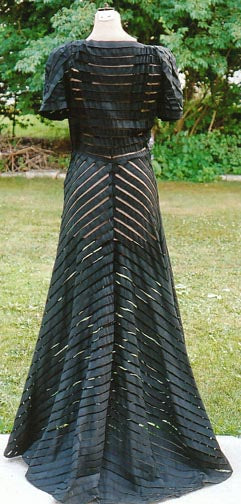
With this process, I am re-creating an effect I enjoyed in an original 1930's net evening gown per my Sept. 2010 post, which you can see Here . I will do so by cutting a similar gown on the bias of my ribbon fabric for the chevron effect-so essential in the 1930's streamline dynamic!
Here is the original 1939 inspiration:


Here is the pattern I am modifying for a sleeveless version of the ribbon frock:

5.9.11 Update
I have completed the ribbon on one yard of the organza cut:

It has a wonderful transparent quality!

6.14.11 Update
First (bodice back) is cut and darts are stitched. This is just the beginning of the labor-intensive stitching process!

6.21.11 Update
Photo shows the process of cutting the bodice front. The pattern calls for self-facing with a fold at center front, but I am cutting along that fold line with a 1/4" seam allowance so I can stitch a strip of ribbon with a like seam allowance of organza so the transparency between the strips of ribbon is not compromised:

Using bodice right front to cut the left front for perfect symmetry!
https://cdn.shopify.com/s/files/1/1130/0994/files/990643.jpg?9664977731047085566>
Shows the ribbon facing stitched in place before turning:

Ribbon facing un-folded:

Shows the alignment of ribbons at the shoulder seam and 'band' effect of center front ribbon forming the collar in one with the bodice front.
I have yet to determine how to press these seams to maximize transparency.
The armseye bias will be white silk organza to maintain transparency.

Bodice front (before gathering). I stitched the ribbon onto the organza with white silk thread for a nicer finish on the bodice pieces as they are more readily viewed up close:

A company from whom I have been ordering cuts for YEARS has done it to me again. They have discontinued a fabric critical to my purpose! Long ago, I planned this project for silk net I can no longer source. So, I have settled for silk net organza, which is a much more dense weave than I prefer, but it will have to do.
I pre-washed and dyed it using Jacquard Lumiere in Super Sparkle to get it as white as possible.
Below, you see my basting line to guide stitching Judith M's 7/8" petersham (in white) onto the silk. I will space each ribbon across the fabric 1/4" apart.
With this process, I am re-creating an effect I enjoyed in an original 1930's net evening gown per my Sept. 2010 post, which you can see Here . I will do so by cutting a similar gown on the bias of my ribbon fabric for the chevron effect-so essential in the 1930's streamline dynamic!
Here is the original 1939 inspiration:
Here is the pattern I am modifying for a sleeveless version of the ribbon frock:
5.9.11 Update
I have completed the ribbon on one yard of the organza cut:
It has a wonderful transparent quality!
6.14.11 Update
First (bodice back) is cut and darts are stitched. This is just the beginning of the labor-intensive stitching process!
6.21.11 Update
Photo shows the process of cutting the bodice front. The pattern calls for self-facing with a fold at center front, but I am cutting along that fold line with a 1/4" seam allowance so I can stitch a strip of ribbon with a like seam allowance of organza so the transparency between the strips of ribbon is not compromised:
Using bodice right front to cut the left front for perfect symmetry!
https://cdn.shopify.com/s/files/1/1130/0994/files/990643.jpg?9664977731047085566>
Shows the ribbon facing stitched in place before turning:
Ribbon facing un-folded:
Shows the alignment of ribbons at the shoulder seam and 'band' effect of center front ribbon forming the collar in one with the bodice front.
I have yet to determine how to press these seams to maximize transparency.
The armseye bias will be white silk organza to maintain transparency.
Bodice front (before gathering). I stitched the ribbon onto the organza with white silk thread for a nicer finish on the bodice pieces as they are more readily viewed up close:
Thursday, April 28, 2011
The Ribbon Corset
I recently did this project since a 'Ribbon Corset' fits so well into my 'Luxe' theme for 2011.
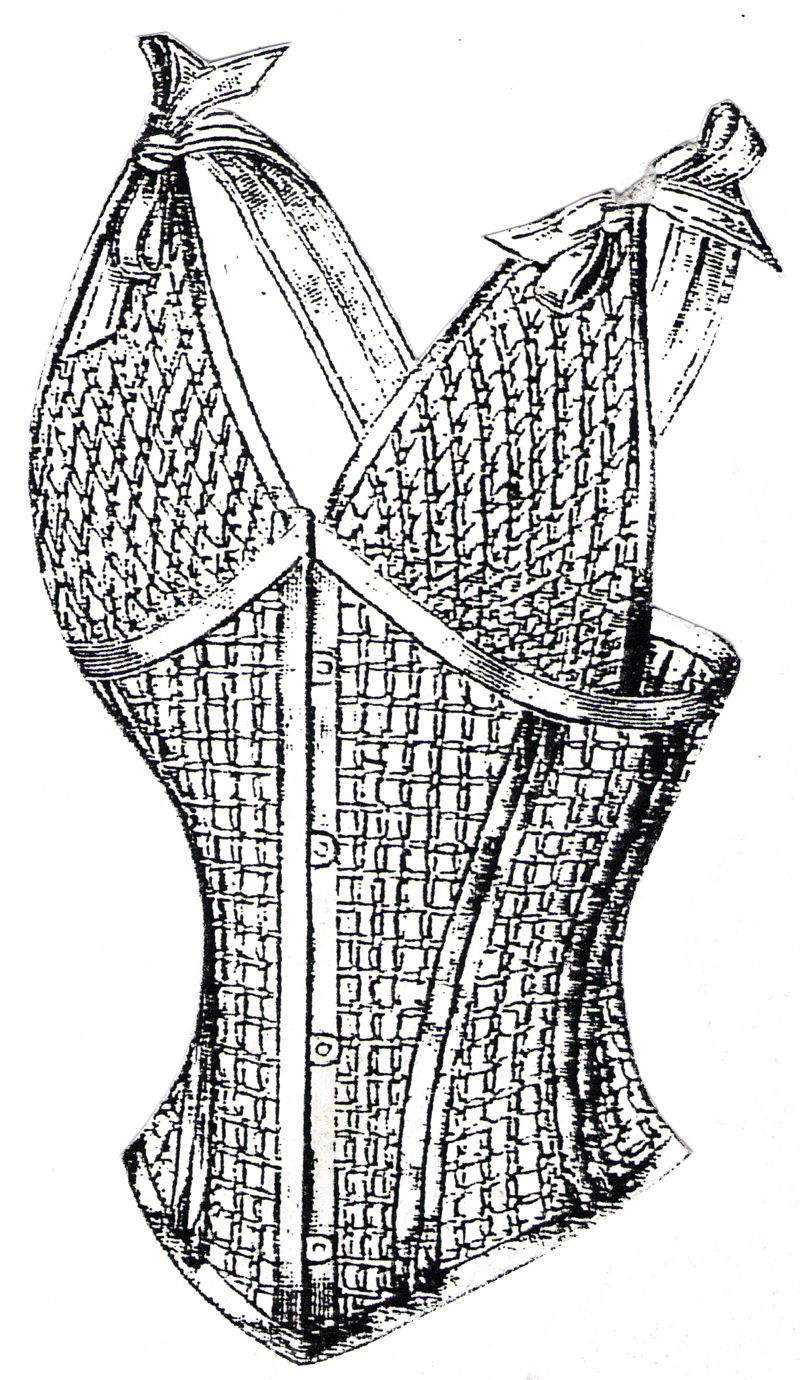
See the original corset art here. It is Ageless Patterns' 1900 Corset in Net (on page 6 of her corset collection).
The following is my rendition of this corset (shown with bust panels omitted) in black silk net and finished with The Ribbon Store's black double-side silk satin ribbon to conceal the velvet stays inside. The top and bottom edges are finished with my trademark double-bias in double-side silk satin:


Without the bust panels, it is shown here over the 1930's evening brassiere:


...and a few technical details:
After stitching the corset seams, I put chocolate cotton velvet stays in place:

The velvet stays fit 1/2" spiral steel on the inside:

Stitching silk ribbon on the outside:

The outside with silk satin ribbons in place:

The following shows how I engineered the silk ribbon to conceal the loop side of the busk by seaming it to the net edge:

Busk edge wrapped in ribbon and ready for hand-stitching into place:

This is my (pre-laced) version with modified bust panels, but I am making them deatchable so here, you see them before I stitched the double-bias to finish the top edge:

Next...One of this year's ribbon frocks (for the Gatsby Summer Afternoon!)
See the original corset art here. It is Ageless Patterns' 1900 Corset in Net (on page 6 of her corset collection).
The following is my rendition of this corset (shown with bust panels omitted) in black silk net and finished with The Ribbon Store's black double-side silk satin ribbon to conceal the velvet stays inside. The top and bottom edges are finished with my trademark double-bias in double-side silk satin:
Without the bust panels, it is shown here over the 1930's evening brassiere:
...and a few technical details:
After stitching the corset seams, I put chocolate cotton velvet stays in place:
The velvet stays fit 1/2" spiral steel on the inside:
Stitching silk ribbon on the outside:
The outside with silk satin ribbons in place:
The following shows how I engineered the silk ribbon to conceal the loop side of the busk by seaming it to the net edge:
Busk edge wrapped in ribbon and ready for hand-stitching into place:
This is my (pre-laced) version with modified bust panels, but I am making them deatchable so here, you see them before I stitched the double-bias to finish the top edge:
Next...One of this year's ribbon frocks (for the Gatsby Summer Afternoon!)
Friday, April 1, 2011
New Patterns
Here is the lastest multi-size pattern:

A single-size pattern, the original of which was generously made available by Roberta at Treadle Yard Goods in St. Paul, MN:

And another single-size pattern made available from customer Shirley in New Zealand:

Also, a 1950's mail-order blouse pattern:

A single-size pattern, the original of which was generously made available by Roberta at Treadle Yard Goods in St. Paul, MN:
And another single-size pattern made available from customer Shirley in New Zealand:
Also, a 1950's mail-order blouse pattern:
Thursday, March 31, 2011
Revision in Pattern Acc30-1887
I was working through style B of this hat pattern the other night to realize I made an error in the instructions.
 .
.
So, if you have this pattern, you can download the two corrected pages here.
You will soon see my version of the hat in black silk double-sided satin. I interlined each piece with silk organza and lined the inside with silk habotai. It goes together very quickly and easily!
It will take part in my wearing the Simplicity 1938 frock as shown below in progress:
Will have good photos posted this summer of the complete get-up ; ), but may have some snapshots available before too long....
.So, if you have this pattern, you can download the two corrected pages here.
You will soon see my version of the hat in black silk double-sided satin. I interlined each piece with silk organza and lined the inside with silk habotai. It goes together very quickly and easily!
It will take part in my wearing the Simplicity 1938 frock as shown below in progress:
Will have good photos posted this summer of the complete get-up ; ), but may have some snapshots available before too long....
Wednesday, March 30, 2011
2011 EvaDress Pattern Contest Results
Here are the projects with the most votes in each of the four categories this year:
For Best Use of Pattern in its Original Form, Debi Fry of Edinburgh, Scotland:

For Best Use of Men's Pattern, Nick Dupras of Leeds, UK:

For Best Use of accessories Pattern, Reagan Foy of Fountain Valley, California:

and Lil Crump of Queensland, Australia:

Thank you EVERYONE for your submissions, it will be great to do this again next year!
For Best Use of Pattern in its Original Form, Debi Fry of Edinburgh, Scotland:
For Best Use of Men's Pattern, Nick Dupras of Leeds, UK:
For Best Use of accessories Pattern, Reagan Foy of Fountain Valley, California:
and Lil Crump of Queensland, Australia:
Thank you EVERYONE for your submissions, it will be great to do this again next year!
Wednesday, March 16, 2011
‘Shirring’ Sheer Delights
I have gotten a good bite into a couple projects I’ve only been dreaming about for years!
Interestingly, they are both based on shirring sheer fabrics not only as a major design tenant, but also as the main technique for shaping the front of the garment.
I have always been fascinated by relative retrospectives in the history of clothing. Here, I am looking 50 years back from the 1930’s (the 1880’s) and observing the reclaiming of clothing design and construction premises.
The ‘first’ project is this 1938 Frock. I am cutting it from white silk crepe georgette printed in black polka-dots with black crepe georgette contrast:

The second project is this 1888 French Blouse. Originally, it is prescribed in faille or bangaline, but I will cut mine in white silk georgette with black lace contrast (pattern coming later this year):

When approaching the 1938 Frock, I had to do some paper pattern adjustment as far as grading and lengthening. I will soon post photos of those processes to share with you as well as technical points in sewing this frock in the sheer fabrics I have chosen. Stay tuned!
Interestingly, they are both based on shirring sheer fabrics not only as a major design tenant, but also as the main technique for shaping the front of the garment.
I have always been fascinated by relative retrospectives in the history of clothing. Here, I am looking 50 years back from the 1930’s (the 1880’s) and observing the reclaiming of clothing design and construction premises.
The ‘first’ project is this 1938 Frock. I am cutting it from white silk crepe georgette printed in black polka-dots with black crepe georgette contrast:
The second project is this 1888 French Blouse. Originally, it is prescribed in faille or bangaline, but I will cut mine in white silk georgette with black lace contrast (pattern coming later this year):
When approaching the 1938 Frock, I had to do some paper pattern adjustment as far as grading and lengthening. I will soon post photos of those processes to share with you as well as technical points in sewing this frock in the sheer fabrics I have chosen. Stay tuned!
Subscribe to:
Posts (Atom)