 Once I have every yard of the metal silk I need for the entire project, I will cut it into the 24x36 inch panels and have about 10 goes with the laser cutter. Stay tuned!
Tuesday, April 1, 2008
Option Explicit-Part Drei 'Fray Factor'
I was finally able to experiment cutting the metal silk a couple weeks ago. It was very satisfying and I have determined the correct laser settings, but I learned that I cannot make a completely clean cut through the fabric to pass it off well enough.
The fray (at right) is too much! I have decided that simply etching the fabric with the laser-cut pattern is the way to go for an equally impressive fabric design as seen at left.
Once I have every yard of the metal silk I need for the entire project, I will cut it into the 24x36 inch panels and have about 10 goes with the laser cutter. Stay tuned!
Once I have every yard of the metal silk I need for the entire project, I will cut it into the 24x36 inch panels and have about 10 goes with the laser cutter. Stay tuned!

Wednesday, March 5, 2008
Option Explicit-Part Deux
Strength of (Fabric) Materials
I am studying Silk Metal Organza to prepare it for the parametric design to create my metal lace and the first step is to do proximity tests on it. The fabric is 80% metal and 20% silk-the color is silver.
Since I am essentially 'de-materializing' the material to create the new metal lace, I wish to see how close I can cut the figures in my pattern design without the fabric loosing structural integrity.
As shown below, using 'analogue' dressmaking shears, the cuts are too close together at 1/8" apart, making the fabric too weak and it breaks between openings. Looks as though the minimum agreeable distance between figures is 1/4".

Also interesting to note at this preliminary stage is the limitation the machinery imposes on the design at a couple of scales. On the smaller scale, my 44" wide cut organza (I need a total of 3-1/2 yards) has to fit into a 24" by 36" laser cutting bed, so I have to give up 8" of manufactured width and one selvage in order to even cut the design into it with the laser. Also, I cannot do a long run of yardage at one time. The fabric has to be cut to 24" by 36" pieces which are totally flat.
On the larger scale, this affects the overall design of the frock. I will have to make the seams from piecing these 24x36 sections together part of the overall design which works well in the scheme of the 1930's-the decade this frock pattern originated. Also, I am cutting the frock on the bias which requires piecing much of the time anyway-more later!
Also see the finished-state post.
I am studying Silk Metal Organza to prepare it for the parametric design to create my metal lace and the first step is to do proximity tests on it. The fabric is 80% metal and 20% silk-the color is silver.
Since I am essentially 'de-materializing' the material to create the new metal lace, I wish to see how close I can cut the figures in my pattern design without the fabric loosing structural integrity.
As shown below, using 'analogue' dressmaking shears, the cuts are too close together at 1/8" apart, making the fabric too weak and it breaks between openings. Looks as though the minimum agreeable distance between figures is 1/4".
Also interesting to note at this preliminary stage is the limitation the machinery imposes on the design at a couple of scales. On the smaller scale, my 44" wide cut organza (I need a total of 3-1/2 yards) has to fit into a 24" by 36" laser cutting bed, so I have to give up 8" of manufactured width and one selvage in order to even cut the design into it with the laser. Also, I cannot do a long run of yardage at one time. The fabric has to be cut to 24" by 36" pieces which are totally flat.
On the larger scale, this affects the overall design of the frock. I will have to make the seams from piecing these 24x36 sections together part of the overall design which works well in the scheme of the 1930's-the decade this frock pattern originated. Also, I am cutting the frock on the bias which requires piecing much of the time anyway-more later!
Also see the finished-state post.
Monday, February 11, 2008
Option Explicit
Making the Fabric-An Added Dimension to Dressmaking
How many times have we envied fashion designers for being able to design 'their own' fabrics?
Well, thanks to parametric design, I may have broken into the realm of possibility!
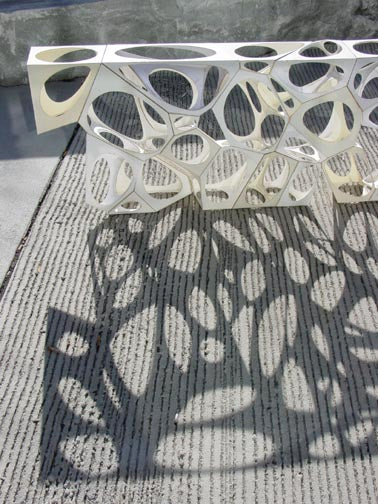
In being taught to script a 3D modeling program (Rhinocerous 4.0) I learned how to script patterns of many different geometries. Doing this has been extremely cool, but it keeps getting even better when I think about it in terms of fabric! We laser cut patterns into small panels of heavy paper board and then joined the edges of each panel into a cell which created what I think of as a 3-dimensional lace. (photo below-I always try not to become completely mesmerized by the beautiful shadows this model produces!)
At some point, I plan to create a really beautiful pattern via script and experiment laser cutting metal silk organza with it. I think of this as my metal lace.
The pattern below is the base of a design which I have modified for bias cut metal lace. Since silver metallic lace is so hard to find these days, it is thrilling to think of making it myself so the frock will finally come to life!

In-progress post.
Also see the finished-state post.
How many times have we envied fashion designers for being able to design 'their own' fabrics?
Well, thanks to parametric design, I may have broken into the realm of possibility!
In being taught to script a 3D modeling program (Rhinocerous 4.0) I learned how to script patterns of many different geometries. Doing this has been extremely cool, but it keeps getting even better when I think about it in terms of fabric! We laser cut patterns into small panels of heavy paper board and then joined the edges of each panel into a cell which created what I think of as a 3-dimensional lace. (photo below-I always try not to become completely mesmerized by the beautiful shadows this model produces!)
At some point, I plan to create a really beautiful pattern via script and experiment laser cutting metal silk organza with it. I think of this as my metal lace.
The pattern below is the base of a design which I have modified for bias cut metal lace. Since silver metallic lace is so hard to find these days, it is thrilling to think of making it myself so the frock will finally come to life!
In-progress post.
Also see the finished-state post.
Sunday, January 27, 2008
Possibility of the Perforation
As part of my Architectural graphics coursework, I read about the perforated cards used in the 19th century containing digital information (via perforations) to control textile looms. Of course in relation to that course, the bridge was being built to the use of digital information in computer systems, but I claim it also applies to the original tissue patterns dating as late as the mid-1950's.
If we think about it, these perforated markings on the pattern allow us to control where we make an indentation in the fabric surface via tailor tacks, chalk or carbon tracing. The perforations also enable us to do aligning functions with the patterns when placing the pattern with respect to the grain of fabric or when placing a pocket or other application accurately on the fabric design.
Paper sewing patterns are a special part of developable surface exploration. I know so many of you have told me you are as excited as I am about the 2-D paper becoming a 3-D garment via darts, folds, tucks, seams, etc.

The perforated markings which create the dart at the keyhole neckline in the pattern of a blouse I started last night.
If we think about it, these perforated markings on the pattern allow us to control where we make an indentation in the fabric surface via tailor tacks, chalk or carbon tracing. The perforations also enable us to do aligning functions with the patterns when placing the pattern with respect to the grain of fabric or when placing a pocket or other application accurately on the fabric design.
Paper sewing patterns are a special part of developable surface exploration. I know so many of you have told me you are as excited as I am about the 2-D paper becoming a 3-D garment via darts, folds, tucks, seams, etc.
The perforated markings which create the dart at the keyhole neckline in the pattern of a blouse I started last night.
Saturday, January 26, 2008
On the Boards - Look what's coming!
Customer Melissa sent me some some killer patterns that had originally been her grandmother's. Among them is a 1933 McCall (top-most image) I have been looking for over the last few years! So, it will be among the first I will make available in multi-size format.
E-mailing your preferences about what you want of these first will help very much!


E-mailing your preferences about what you want of these first will help very much!
Saturday, January 19, 2008
Grading the Raglan Sleeve
Elle requested that I share the process of grading the raglan sleeve down in size on pattern B30-4851

so here is...
Taking the raglan sleeve in is quite simple since there is normally a dart at the shoulder line rather than the traditional sleeve seam in the top of this sleeve style.

I simply shorten the length of this dart by cutting through a horizontal line I draft on the pattern between the middle set of perforations and the single perforation. I take it in 1/4" for each size down I wish to take the pattern as indicated here:

This pattern is unique in that it has a raglan sleeve that does not extend all the way to the neckline, so there is a bit of standard shoulder length to consider. If the adjustment above is not enough for the desired effect, one can also draft a vertical line from the shoulder seam to the bustline and cut along this line, taking it in 1/4" at the shoulder seam end to nothing at the bustline for each size the pattern is to be brought down:

so here is...
Taking the raglan sleeve in is quite simple since there is normally a dart at the shoulder line rather than the traditional sleeve seam in the top of this sleeve style.
I simply shorten the length of this dart by cutting through a horizontal line I draft on the pattern between the middle set of perforations and the single perforation. I take it in 1/4" for each size down I wish to take the pattern as indicated here:
This pattern is unique in that it has a raglan sleeve that does not extend all the way to the neckline, so there is a bit of standard shoulder length to consider. If the adjustment above is not enough for the desired effect, one can also draft a vertical line from the shoulder seam to the bustline and cut along this line, taking it in 1/4" at the shoulder seam end to nothing at the bustline for each size the pattern is to be brought down:
Monday, December 24, 2007
Love the Man Look
The man look became big in ladies’ attire of the 1930’s at first for business wear to ‘indicate seriousness of intent’ (Stella Blum, Everyday Fashions of the Thirties), but also filtered into other ladies' day and evening wear. The man look never goes out of style and even if it did, my wardrobe would still include it!
Pattern SE30-1210 is a super rare pattern which is the earliest ladies’ street trouser pattern I have ever found.
I think the rendered model in the center of the pattern art resembles Marlene Dietrich (who alongside Katharine Hepburn popularized ladies’ wide leg trousers during this decade).

Click here to see pieces a customer made from the pattern. As Nick indicates in his entry, the top-stitching at each trouser pocket is a distinctly German detail in men's tailoring.
Pattern SE30-1210 is a super rare pattern which is the earliest ladies’ street trouser pattern I have ever found.
I think the rendered model in the center of the pattern art resembles Marlene Dietrich (who alongside Katharine Hepburn popularized ladies’ wide leg trousers during this decade).
Click here to see pieces a customer made from the pattern. As Nick indicates in his entry, the top-stitching at each trouser pocket is a distinctly German detail in men's tailoring.
Subscribe to:
Posts (Atom)
