Technically this is a shawl collar, so the collar may be attached and enclosed in the usual shawl collar manner which is outlined further down in this post. Alternately, the collar may be constructed and then attached which is first detailed below.
You ask which method to use? The answer is simply up to your sewing experience or will to learn a new method as we all know in sewing, there is more than one way to go about many things.
Joining the collar/collar facing and then attaching to the wrap:
Side note: No matter which method is used, the first steps are to shir and dart each collar and facing section. The images do not show the lining that would otherwise be included in the process of making this wrap. Click images for larger views:
Sew optional band to outside of collar section (not shown).
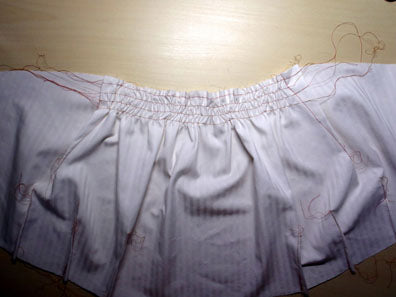
Run long basting stitches along inner edge of collar section, as indicated on pattern. The first row of stitches is applied 3/8" from the raw edge and subsequent rows are stitched 1/2" apart. It is then important to bring all thread tails of the shirring rows to the wrong side of each collar and facing section. This way, they can be caught into the center of the large dart you are about to sew, and then secured, thus not showing on the right side. Shir and dart collar facing the same:

Shows the wrong side of collar with thread tails brought through and dart is stitched. Cut dart and press open:

Shows the right side of collar with thread tails brought through and dart is stitched:

After sewing the smaller darts along the opposite edge, press darts toward center back of each section. With right sides together, stitch collar and collar facing sections together along un-notched edge. Turn and press seam in edge; baste open (notched) edges together.

Trim extra seam allowance edges from corner:

Clip into seam allowance of fold line at wrap front, shown as a O in this photo:

The fold line at wrap front is indicated in this photo by a black line. Align the basted edge of collar/facing with the top of that line to ensure corner of collar is exactly matched with corner at front fold-line seam allowance. This should ensure that seam lines will converge between the faced collar and wrap-baste in place:

Turn wrap on front fold line so raw edge of wrap facing is even with raw edges of collar and wrap front underneath. Photo shows (from wrong side) the fold line turned with front corner of collar brought through the clip (made into the seam allowance from a couple steps before). Stitch in place:

Shows collar and facing turned (circle mark is lightly visible at corner of joining):

Joining in the shawl collar manner (these first steps are repeatedly posted from the process given above):
Sew optional band to outside of collar section (not shown).
Run long basting stitches along inner edge of collar section, as indicated on pattern. The first row of stitches is applied 3/8" from the raw edge and subsequent rows are stitched 1/2" apart. It is then important to bring all thread tails of the shirring rows to the wrong side of each collar and facing section. This way, they can be caught into the center of the large dart you are about to sew, and then secured, thus not showing on the right side. Shir and dart collar facing the same:

Shows the wrong side of collar with thread tails brought through and dart is stitched. Cut dart and press open:

Shows the right side of collar with thread tails brought through and dart is stitched:

Clip into the seam allowance of front facing turn line, (to circle) as shown in first photo. In this method, the right side of the notched edge of collar is joined with the right side of the wrap neck edge-NOTE: End of stitching is at point where the seam line of the collar edge and wrap edge converge-there is seam allowance which overhangs here. Stop stitches at as in second photo:


The right side of notched edge of collar facing is joined to right side of wrap facing (as is stopping stitches at same point) in same manner as collar section (regard note about seam lines converging at same point, above.

At this time, the collar and facing are joined with right sides together along the outside (un-notched) edge:

The collar is turned right side out as is the wrap/wrap facing along facing fold line indicated on wrap front piece (press seams of collar/facing in edge and press along facing fold line-the collar facing edge is shown not completely sewn to facing edge for reference):

Shows collar/facing joined to wrap from the outside (collar is shown not completely sewn in place for reference):


No comments:
Post a Comment