I experimented with the wing armature,so you will see that soon and will have more to add as I steel the crinoline and build the final skirt of silk gazar!
7.14.10 Crinoline Update
The progress of tipping the top steels and inserting them into the hoop skirt for the bat crinoline:

These are tailor tack markings for the placement of the steel channel.

I tipped the ends of the top two steels with tips I use in spring steel corsetry.

The complete bell-shape crin to go under the bat skirt.
7.19.10 Update
I expect to have this pattern ready for release mid-August, so for those of you wanting to get as early start as possible on this Victorian Bat Costume, I recommend you build the hoop skirt and optional bustle pad using Laughing Moon's pattern #112 Hoops and Bustles (available from AgelessPatterns.com and I am sure elsewhere). I used View A, the bell shape with View F bustle pad. I built my hoop skirt in black cotton twill and omitted the top steel to accommodate the polonaise.
7.26.10 Update
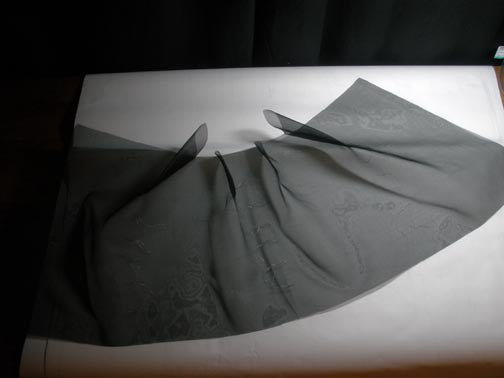
I interpreted the texture on the skirt to be knife plaits. I have hand-tucked them for a slight un-evenness reminiscent of those shutters one sees falling off the windows of haunted houses! This is most apparent in the muslin draping process, top image:

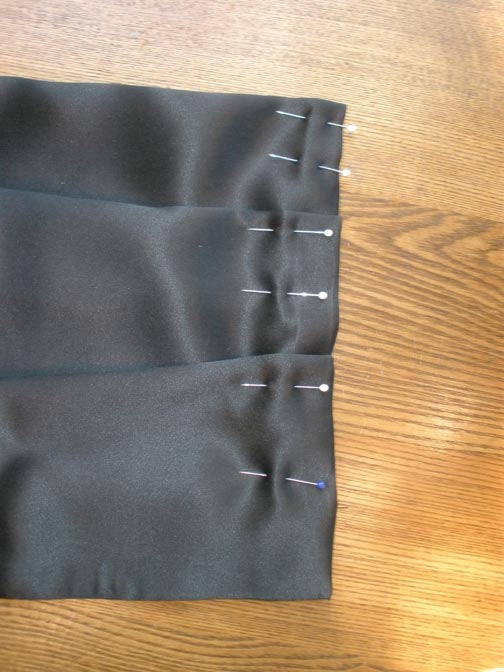
The process of hand-pleating and hand-basting the silk gazar:

I stitch each line of pleats on the placement lines marked from the pattern. This means the top edge of each flounce is 1" above each placement line:

8.2.10 Update
Here are 4 of the 6 layers in pleated silk gazar on the skirt. I have since completed all of the pleating. As I wait for the skirt lining (silk habotai) to arrive, I am draping the fichu (images soon to come).

8.5.10 Update
The completed skirt as I am draping the polonaise. I achieved the texture in the flounces by narrowly hemming them after pleating:

8.12.10
Just a little side note about the corset:
Historically, the bodice of the ensemble would properly have been a boned evening bodice (aced at the back) worn over a corset. For the ease of creating this costume, I have simply specified and furnished pieces for a shaped corset the basque of which is worn lapped over the skirt at the front.
One is certainly able to create a full 1887 corset and wear it under an evening bodice created from the pieces I am furnishing in this pattern.
8.15.10
The complete fabric wing waits for the next step:

Hand basting the outer edge of the wing fabric and facing together:

Top-stitching the basted wing fabric and facing together forming tubing channels for the wing armature:

8.17.10
Working up the double-bias edge on the wings. If you are not comfortable with mitering double-bias, you can use single-bias binding which you may find easier.


8.25.10
You see the final labors on the silk wings. I used 110 gram silk taffeta for the wings. The double-bias edge is self-fabric which you see being rolled over the shaped wing edges:


After catch-stitching the rolled bias to the lining of each wing, I chamfered the end of the vinyl tubing to reduce resistance. I then inserted it into the channels sewn at each wing section seam:


Because the top-most channel is the most curved, I recommend inserting the vinyl there first and work your way down each wing. The short section of vinyl to be inserted at the center back seam should be executed last.
The draping of the final gazar fichu:

Stitching the darts into the fichu shapes the neck edge. It is then finished with a narrow hem.

The fichu is pleated down.

The front edges are then pleated down to 1-3/4" and will then be finished with double-bias binding.
9.1.10
Pleating the polonaise:

and draping it to the final ensemble:


8 comments:
Wow! This is just gorgeous! Where did you find the original pattern? I'd love to know more about the history!
Hello Pattern Junkie,
I obtained a copy of the original issue in which this costume was featured on eBay years ago.
The auction advertised that the pieces were included for this pattern but, when the copy arrived, I found it did not.
Nonetheless, I resolved to make that costume come to life in pattern form on my own!
I will do some more digging in the text to see what the reason was for featuring the bat costume in this January issue. It has been many years since I have done so, but I will post my findings here.
Perhaps the costume was for Mardi Gras, or the European Carnival celebration? Burda Patterns magazine usually features costumes in their February issue for this purpose.
Given the amount of work, it would make sense that Victorians would allow an extra month for such projects.
Indeed Amy, I hadn't realized that Mardi Gras was on in Europe since the middle ages, so this makes a great deal of sense for the January timing. Thank you!
The pleats are lovely - I commend your patience.
Is the construction of the corset/bodice significantly different from the construction of a formalwear-style boned bodice?
I have the book Bridal Couture by Susan Khalje, but I was wondering if construction of corsetry such as for this project is specialized enough to be worth investing in one of the corsetry construction manuals. Any opinions or observations would be appreciated.
Amy, I do not know what your skill in corset building is, but I can tell you that I too, have Susan's book and her advice seems to be very basic when considering building a full-blown corset from history.
As much as I hate to cite a contemporary pattern, you will find Simplicity's Martha McCain series helpful from an illustrative perspective. I would recommend you look at that first and then if you plan to do a great deal of corset building, invest in one of the corest manuals.
I do advise on how to build the corset in the instructions that will accompany the bat pattern, but they are not nearly as line-illustrated as the two sources O noted above.
I will have photos of the entire process here on the blog as well.
This is AMAZING!!
Gorgeous so far! Can't wait to see the finished costume;)
Post a Comment